Visible Captioning of Digital Photos
 |  |
| Caption not visible |
Visible Caption |
On the Labelling Digital Photos page, the details of how to incorporate labelling information inside a digital photo (using IPTC/XMP metadata) is discussed. I do this type of internal labelling with all my photos. The problem at the moment (and for the next few years) is that most software will not automatically display this information, the viewer of the image has to know where to find it.
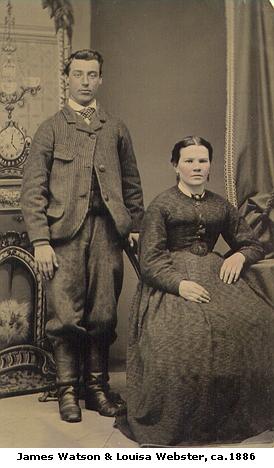
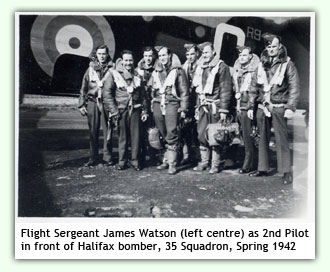
With my genealogy digital photos, I want to make sure that everyone, no matter what computer or software they have, can view the caption. The solution for this is to make the caption a visible part of the photo, such as you can see on the photo to the right. This page is not intended as a detailed tutorial, two methods of doing this type of captioning will be reviewed, one manual and one semi-automatic.
Manual Captioning using Photoshop (or equivalent)
Manual captioning can be done using any photo program that can add text to a photo. For this example, we'll use Adobe Photoshop (or Photoshop Elements) - but the same principles apply to any photo program that has similar capabilities. One thing we're going to do is to add some caption space outside of the original photo so that we don't obscure the original photo with text - the text will be in a separate space.
 - Load the photo you wish captioned into Photoshop
- Save the photo with a new filename (following the rule to always work with a copy of the photo, not the original)
- Open the Image > Canvas Size menu selection - this will allow you to add white space (caption space) to the photo.
- In the Canvas Size dialog, de-select (uncheck) "relative" - this will ensure that the pixel dimensions of the photo are shown.
- In the section titled "anchor" - click on the top middle square so that the arrows all point away from this square. That selected square is your image - the arrows indicate where the new canvas space will be placed.
- In the height box - add about 50% white space - for instance, if your height is 1200, change it to 1800. Too much is okay since you can crop out the extra whitespace later. Select the canvas extension colour to be white. Now click OK to return to your editing screen.
- Your photo will now have a section of white at the bottom - you're now ready to add text.
- Select the text tool, make sure the colour of the text is black and start typing (see below for text dialog issues).
- Using the text tool, adjust the font size so that the text can be clearly read*
- Once you've typed in your caption text and are happy with it crop the photo so that it looks good and save it.
* Font size can be a bit tricky. Keep in mind that you may be looking at the image at your screen size rather than the size of the image. For instance, your image might be 4,000 pixels wide but you may be looking at it on a screen that only displays 1920 pixels. In this case, if you are seeing the whole image, it means that it is being shown compressed (showing at 47.5% of its actual size) or, if displayed as the actual pixels, then you're only seeing 47.5% of the image at any one time. You may have to adjust your font size to account for this since for many people, their computer or smartphone will display it compressed to screen size. Font size will also be dependant on the internal PPI setting of the photo if you are using a font size in points (as opposed to the font sized in pixels). See Hint 1 below for more info.
A few hints
As noted, this is not a detailed tutorial - but here are a few potential issues you might run into with Photoshop:
- If you have your type tool set to points instead of pixels, then it's going to be tied to the virtual print size of the image which is controlled by the PPI setting in Photoshop. To ensure consistency, either use the type tool with it set to pixels, or change the PPI setting to be the same for every photo (i.e. 300). For instance, a photo set at 72 ppi with a font size set to 75 points will be the same size as that same dimension photo set at 300 ppi with a font size set at 18 points.
- Keep in mind the magnification level - text doesn't always look good when you're viewing the photo at a magnification other than 100%
- When you add text, it will do so on a new layer in Photoshop. When you go to save the image, Photoshop usually default to saving it as a PSD (photoshop) file in order to preserve the layers. Once you're happy with the captioning and feel no need to edit it again, flatten the image and then save it as a compressed TIF (and for sending to relatives, also save it as a JPEG).
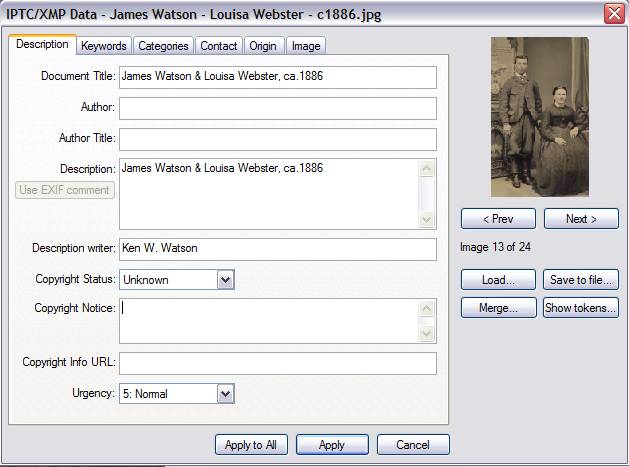
- You can copy and paste your IPTC/XMP description if you wish (to save time typing) - assuming that you've already added the IPTC/XMP description to the photo. Go into the File Info section, select the description text and right mouse click to bring up the context menu and select copy. Now go back to the photo, and with the text tool selected, click on the photo (so that you get the text cursor showing). Now paste the text. You'll get a single sting of text which you can resize and broken up into lines to use as your visible caption. If you have a 1,000 photos you want this done to in semi-auto mode - then read the Breezebrowser description below.
Visible Captioning using Picasa
Of note, Google discontinued support of Picasa in favour of Google Photos (which has fewer editing capabilities) in 2016. Copies of the last version, Picasa 3 (3.9.141), can be found on the Internet if you look around.
Google's free photo program, Picasa, can do visible captioning but there is a bit of a workaround to get the end result as a new photo.
Enter your caption data any way you wish - either as IPTC description using any software (see digital labelling) - or using Picasa's Caption feature.
- While viewing an individual photo that contains IPTC/Caption information, select the "Print" option.
- On the Print Page, one of the options on the left side is "Border and Text Options" - select this.
- In Border and Text Options you can select the font style, size and placement of the caption text, including an option to wrap the text. You can see the result directly on the displayed photo.
Now the problem - you have a nicely visibly captioned photo but no way (that I can find) to save that directly as a photo image (i.e. as a JPEG file) - so now comes the workaround.
- Workaround 1 - if the picture you want is smaller than your viewing screen* then simply use the "Print Screen" key on your keyboard (Windows computers - I don't know the equivalent on a mac) - this will copy an image of the screen to your clipboard. Then run any photo software, either choose New Image and then do a Paste, or with some you may be able to do a Paste directly. Now crop the screen image to just the photo and save it - you have a new visibly captioned photo.
- Workaround 2 - if the picture you want is larger than your viewing screen* then print the photo as a PDF (free software such as CutePDF maker is available if you don't have a PDF printer installed). Those experienced with PDF will be able to adjust their software to maximize the quality of the image (i.e. set it to Press Quality or equivalent). Now print the picture. The resulting PDF can be loaded into any PDF capable photo software (i.e. Adobe Photoshop or Photoshop Elements) which will allow you to re-save it as a JPEG (or TIF).
* Picasa will always show the image as fitting the screen, but the source image may be larger than your screen. When printed as a PDF it will use the resolution of the source image.
Caption Pro
This is a program that is specifically designed to add text into a caption area below the photo. It's very simple to use and does the job quite nicely. If you have a lot of images that you wish to visibly caption, it would be worth looking into this type of dedicated software. It's commercial software but has a free trial period so that you can test it out. There is also a web version allowing you to caption photos that you upload.
Caption Pro is available for PC, mac, iPhone and iPad. You can see all the details on the Caption Pro website:
captionpro.com.au:444/AlekaConsulting/index.php/caption-photos/
Snip Tag for Mac
A Mac program that allows the easy entry (single or batch) of IPTC/XMP metadata and also the visible captioning of photos. This program (desktop app) also features easy photo cropping features, including a batch cropping mode.
You can see all the details on the Snip Tag for Mac website:
sniptagapp.com
Visible Captioning using Breezebrowser
Given that you've already entered the IPTC/XMP description to the photo, is there an easy way to take that existing information and make it into a visible caption. One method, described above, is to copy and paste that data. But it's still a manual (slow) method - can the process be automated? The answer is yes, sort of.
The thumbnail program Breezebrowser has, as a byproduct of some of its functions, the ability to do visible labelling using existing IPTC/XMP data. It's not specifically designed for this, so there are a few tricks to make this work - but it can be done.
The sequence in a nutshell is:
1) Enter the IPTC/XMP description data
2) Caption the photos, using the "Proof" command in Breezebrowser, putting the IPTC caption data onto the photo.
1) Enter the IPTC Data - this has been detailed on the labelling page. The difference if you're doing this with Breezebrowser with the intent of doing visible labelling is to enter line breaks (Enter key) at spots you think the lines should wrap (this will depend on the number of caption lines that you have, the font size you use for captioning, and the size of your resulting image) since Breezebrowser doesn't do automatic line wraps. You'll have to experiment with this.
 2) Proof your Photos - In Breezebrowser, "proofing" means creating a new photo from your original using various options. It is in the "proofing" that your photos will be captioned. There are a large number of options - the main ones that you will generally use will be resizing, adding a border, sharpening, and adding a watermark (the caption). 2) Proof your Photos - In Breezebrowser, "proofing" means creating a new photo from your original using various options. It is in the "proofing" that your photos will be captioned. There are a large number of options - the main ones that you will generally use will be resizing, adding a border, sharpening, and adding a watermark (the caption).
a) Size - this is up to you, you can caption the original photo or you can re-size the photo to a standard size that will be viewable, full size, on a typical computer or TV display. Today that means a maximum of about 1920 x 1080 pixels. On my CDs, I include the original photos as well as the proofed (captioned) photos so people can always go back to the largest possible image for high quality printing. The other advantage of resizing for captioning is that you have a consistent image size which means you won't have to worry about different font sizes - you can pick one size of text and it should work for all your photos.
b) Border - this is where you can add a white space for the caption. I've found that for the font I use (a 7 or 8 point sans serif font such as Arial), that about 20 pixels per line works well. Since many of my captions are only 1 or 2 lines, I generally start with doing them all at 40 pixels and then adjusting accordingly. Select the border to be "bottom only."
c) Sharpen - if you are resizing the photos, they will probably need to be sharpened. A setting of 0.5 Radius, 1.0 Amount and 2 Threshold is often a reasonable starting point.
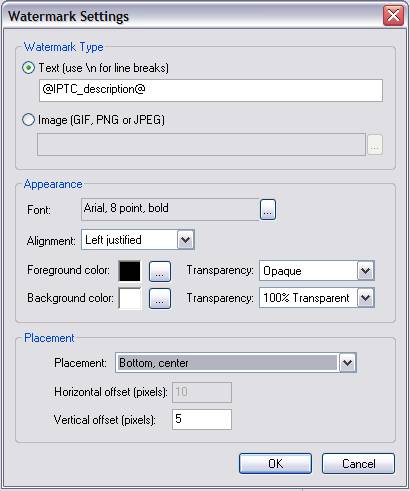 d) Watermark - select "Watermark 1" by clicking on the "Settings" button. This brings up a dialog box where you can enter your captioning data. In our case, we will be using the IPTC caption data. To do that, we enter the command "@IPTC_description@" (exactly like that without the quotes - the command is case sensitive ("IPTC_" in caps, "description" in lower case) - the underline symbol "_" is done by holding down the SHIFT key on your keyboard and pressing the "-" dash key). Using this command will make Breezebrowser use the text you put in the IPTC description box. Note that older versions of Breezebrowser used the command "@IPTC_caption@" rather than the current @IPTC_description@. d) Watermark - select "Watermark 1" by clicking on the "Settings" button. This brings up a dialog box where you can enter your captioning data. In our case, we will be using the IPTC caption data. To do that, we enter the command "@IPTC_description@" (exactly like that without the quotes - the command is case sensitive ("IPTC_" in caps, "description" in lower case) - the underline symbol "_" is done by holding down the SHIFT key on your keyboard and pressing the "-" dash key). Using this command will make Breezebrowser use the text you put in the IPTC description box. Note that older versions of Breezebrowser used the command "@IPTC_caption@" rather than the current @IPTC_description@.
Now choose the font type and size, the foreground (font) colour, the background colour and the opacity of each (keep in mind that Breezebrowser was primarily designed to add watermarks directly onto the body of a photo). Since we've already created a white background (the bottom border), you should make the background colour white, or make it transparent.
Finally, choose placement. If you have multiple lines, a good placement is bottom centre, with a font alignment of left justified. Since proof generation is so fast and easy, feel free to play around with these settings until you get the effect you want.
e) Output Setting - here we can specify of output we want (usually JPEG) and if JPEG, a quality setting. If putting photos on CD, then a setting of 90 is generally very good (100 is best, but produces a large file size). If putting photos on the web, then a setting of 75 will produce a smaller file size with good quality. Check the output directory (folder) which will usually be a directory called "proofs" under the directory you are working in.
f) Rename - you can rename your images as part of the proofing process. In the example above, the images are being renamed using their original filename with the addition "-captioned". If the original was named 350-5028.jpg then the proofed version will be renamed as 350-5028-captioned.jpg. You can use any convention you like (for instance, just add a "-c" to indicated a captioned photo) - it's simply a good idea to have your captioned photos with a slightly different filename than the originals. Keeping the original name as part of the new name will allow you to easily cross-reference the captioned photos with the original photos.
You are ready to go, so now click on the "Proof" button.
Once the proofing is completed, use Breezebrowser to look at the results. If you don't like what you see, go back to the original images, run the proofing option again and make any required changes.
In a project I did a few years ago each directory contained about 200 photos. Running the proofing option with my standard settings, worked on about 80% of the photos (those with 1 or 2 lines of captioning). Some photos had more lines, so I went back to those, adjusted the border to be 60 (or more) pixels, and ran the proofing just on those photos. This worked well and was quite quick.
Once the process is done, you can check what your proofs look like and make adjustments.
At the end of the day, you should have a full set of originals (with IPTC/XMP caption data in them), plus a set of "visibly captioned" photos.
|