Building an Artificial Loon Nesting Platform
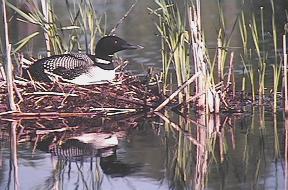 |
| Loon on a natural nest |
Loons are the bird most synonymous with the beauty of nature. Their sleek appearance and haunting call defines the Canadian wilderness. While loon populations in Canada are doing quite well, they sometimes have a problem nesting in areas with fluctuating water levels. Since in several areas, this fluctuation of water level is man made, it is up to us to resolve the problem for the loon. A simple resolution, that anyone can do, it to build a loon nest.
An artificial nest has other advantages as well. If properly located, it reduces the chances of animal predation on the eggs (ie. eating the eggs). It often provides us with a better view of a nesting loon, a wonderful sight. And, in my area at least, when the loon isn't using the nest, it becomes a sun deck for turtles.
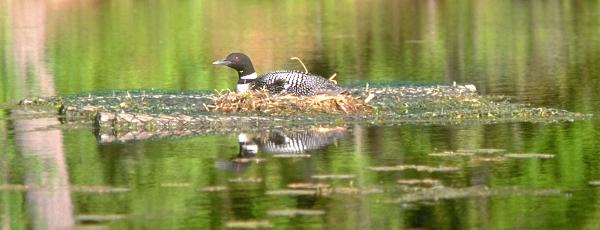
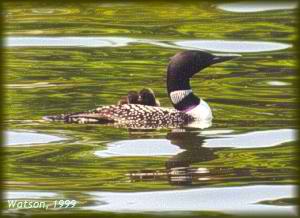
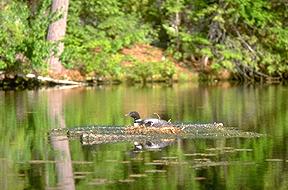 |
| Loon on an artificial nest |
Although loons don't necessarily mate for life, once a nesting pair finds your nest, they will come back year after year to make use of it. With proper maintenance, the loon nest will last for several years. The picture on the right shows a loon nesting in the spring of 1997 on a nest that I built. She successfully hatched two chicks.
The cedar log design is based on my own experience. I have also added a novel idea to make a nest out of PVC piping, which follows the description of the cedar log construction. In both cases the aim is to build a floating platform, about 5 to 6 feet (1.5 to 1.8 metres) square.
Building A Cedar Log Nest
Materials needed:
- Five (5), six-foot lengths of five to eight inch diameter dry logs, preferably cedar.
- Vinyl coated fencing, two (2) - four foot by 6 to 8 foot lengths
- Six (6) lag bolts of sufficient length to penetrate two logs (8 - 10 inch - zinc coated or stainless steel).
- A dozen 1 inch (or so) diameter washers that will fit the lag bolts (zinc coated or stainless steel)
- heavy duty hammer staples (to fasten the fencing to the nest)
- An anchor (a cement block works great)
- Anchor line (chain, aircraft cable or UV resistant rope).
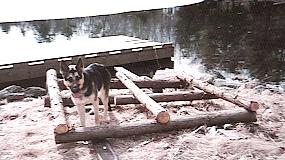 |
| Katie supervising building of the artificial loon nest |
As can be seen from the pictures at the top and bottom of this page, the nest floats low in the water, allowing the loon to easily climb on and off it (the female regularly leaves the nest to feed). The picture to the left shows the completed framework for the nest. Note that I added a couple of shorter logs on the bottom, in the center. These are optional .. I just had them lying around.
To build the nest:
- Start close to shore, you don't want to have to lug this thing too far on land.
- Lay the two biggest logs on the ground, a distance apart so that the other three logs, which will form the surface of the nest will overlap by a few inches.
- Use an axe (or saw) to notch the logs a bit where the upper and lower logs will meet (this makes for a more solid fit).
- Lay the other three logs on top of the lower two, equally spaced.
- Drill holes for the lag bolts where the upper and lower logs meet (if you don't have a long enough bit, drill one log at a time). The hole should be a tad (smidgen) bigger than the diameter of the lag bolt.
- Put the lag bolts through the holes, with washers at both ends, and tighten them down. Your frame is now in place.
- Take your two pieces of vinyl coated fencing, lay them on top of the frame, making sure they wrap around the frame a bit (so that the fencing will be in the water, making it easier for the loon to climb on and off the nest)
- Use the hammer staples to fasten the fencing in place.
- Now, attach one end of the anchor line, and put your nest in the water.
- It should float about 1 - 3 inches above the water. If it doesn't, place empty 1 gal plastic containers (i.e. juice jugs, detergent jugs, or other UV resistant plastic - do not use windshield washer jugs as these will quickly fall apart) under the nest, fastened to the fencing to help in flotation.
- Put a base layer of sod or other material to encourage the rooting of natural vegetation on top of the nest. Add some local vegetation to get it started (typical near shoreline vegetation). NOTE: I used to recommend straw as nesting material, but it can cause Aspergillosis in loons, so no longer recommended.
- Tow the nest out to a suitable spot (see below), attach the anchor(s), and wait for the loon.
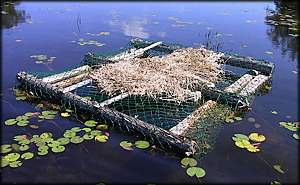 |
| Loon nest just after the chicks have hatched and the loon has left (photo taken June, 2003) |
There are several guidelines for nest placement:
- It should be 30-60 feet / 9-18 metres off shore.
- The area should be sheltered from wave action (a small bay is often ideal)
- It is advantageous if the nest can experience some slight breezes (helps keep bugs off the nesting loon).
- It should be out of the way of human disturbance as much as possible.
- It should be in about 4 to 6 feet (1.2 - 1.8 m) of water in or near a natural feeding spot for loons.
Don't get discouraged if the loon doesn't nest in the first year. When I first put the float out I saw the female loon climb up on it a few times, but she never took to nesting on it. As far as I can tell that year, they either never nested, or never had a successful hatch of chicks (I never found a nest and they didn't have chicks that year). The nest was new and I had put branches (pine & spruce) on it, which I think might have been part of the problem with the loon not taking to it.
In the second year, I covered the nest with better material (long grasses and bulrushes collected from local wetlands). Again she climbed up on it a few times and then one morning the material was arranged in a mound and that afternoon I saw her sitting on the nest.
Today it is recommended that you sod the top of the nest to allow natural vegetation to grow on it.
Long Term Maintenance
Check the condition of the nest each year. Is the rooting material on the surface still in good shape?
Check to make sure the anchor rope is still in good shape (it has to be replaced every few years).
Is it still floating okay. If not, add more flotation in the form of UV tolerant plastic jugs. Styrofoam is not recommended since it will disintegrate over time.
I've had to add a couple of hardwood bracing slats (old hardwood floor pieces) under the fencing on the deck of the nest, to prevent it from sagging.
Building A PVC Nest
This section is based on a concept pioneered by Jeff Lange (Michigan Loon Preservation Association) as adapted and modified by Marc Grushcow. My thanks to Marc for permission to use his photos. This plan will make a 5' x 5' nest although alternate dimensions (5' x 4', 6' x 5', etc.) are acceptable.
Materials:
- 25 feet - 4 inch PVC piping (white sewer pipe works well).
- 4 - 4 inch PVC 90 degree elbows
- 2 - 4 inch PVC T-junctions
- 1 can PVC adhesive
- 3 - 6 foot long x 4 inch wide hardwood slats
- 12 feet of 4-foot wide plastic outdoor fencing (2 inch or less mesh)
- 1 roll 18 gauge galvanized wire or plastic coated copper wire.
- 6 UV tolerant plastic jugs (not windshield washer fluid jugs. Suitable jugs are juice jugs, laundry detergent jugs or bleach bottles (well rinsed)
- 1 small olive green acrylic latex paint (optional)
- 2 concrete blocks
- 40 feet of nylon (UV tolerant) rope or wire aircraft cable (better but much more expensive). If using aircraft cable, then four "U" type cable clamps will also be needed.
Construction
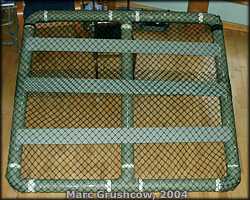 - Saw the PVC pipe into three 5-foot lengths and four 2.5-foot lengths
- Glue two short pieces into either end of the T joint. Remember to put glue both on the outside of the end of the pipe to be inserted into the joint and on the inside of the joint. Don't be stingy with the glue. You must have an
unbroken ring at least an inch wide around both the pipe and the fitting
in order to get a complete seal. If you don't, you risk a leaky nest.
Repeat this procedure for the other T-joint.
- Add a 90-degree elbow to each end. Once you've fitted each
joint, lay the pipe on the floor and make sure that the T-junction and the
90-degree elbow are flat on the floor. You now have assembled two ends. Each has a 90-degree elbow,
short straight pipe, T fitting, short straight pipe, and 90 degree
elbow.
- Take one of the ends and the three remaining 5-foot straight pipes
and glue the pipe into the joints. At this point, if you stand it up,
you have something that looks like |_|_|
- Here's the tricky part. You need two people for this. Take the
remaining end and put glue on the inside of the two 90-degree elbows and the T-junction and then the
outside of the three straight pipes and fit the whole thing together.
This is tricky because you have to get this all glued and assembled
before the glue sets. Fit the elbows and T-junction onto the three
pipes. Marc noted that he bounced the nest on its end to help make sure that the pipes were fully seated.
- At this point, an option is to paint the PVC piping if you don't want it to be white. If painted, leave at least a full day (preferably a few days) for the paint to fully harden before doing more work on the nest.
- Cut the slats to a length such they just fit across the top of the frame. Sand smooth the ends of the slats. Lay the slats evenly across the top of the PVC frame and wire to the frame.
- Cut two sections of fencing, about six feet long each. Position fencing loosely in position on top of the nest, so that the centre portion overlaps, and fasten down one end of the fencing to one side of the frame with wire. Then stretch the other end as tightly as possible and fasten with wire to the other side of frame. Don't worry about how tight you get the fencing as the slat boards will prevent it from sagging.
- Fasten the 6 jugs under each of the slats using wire.
- Check the nest to make sure there are no wire ends sticking up.
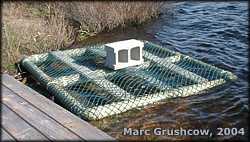 - Put the nest into the water and test the floatation with a concrete block. It should float 2 to 3 inches above the water.
- Attach the cement blocks and anchor lines to two diagonally opposite ends of the platform.
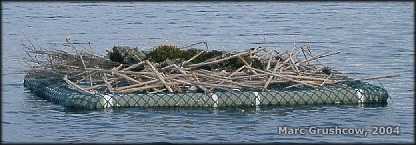
- Put a base layer of sod or other material to encourage the rooting of natural vegetation on top of the nest. Add some local vegetation to get it started (typical near shoreline vegetation).
- Tow the nest to its final location which should be a sheltered area, about 30 to 60 feet (9 to 18 m) off shore, in 4 to 6 feet (1.2 to 1.8 m) of water (see the guidelines for placement in the first section).
- Place anchors so that there is some slack in the rope or cable, enough to compensate for fluctuating water levels, while keeping the nest steady.
Eagles and LoonsI received an email from Brian Sabbath who said that he had a problem with eagles, specifically that they like to eat loon eggs. To solve the problem, Brian put branches around the perimeter of his artificial nest (sticking up). According to Brian "the eagles never bothered the nest again."
BUT - do NOT put raptor bars on a Rideau nest unless you actually have an eagle problem. In this area we have lots of ospreys - they never bother the loons. But I have an example of new nest where loons didn't take to it until year 3 of the nest, after it had lost its raptor bars (after a muskrat piling vegetation on it flipped the nest over, breaking the bars). It seems the overhanging bars spooked the loons and prevented them from using the nest
Nest DiaryOf note in this section is that loons do not necessarily mate for life. Loons are very territorial and will compete for the best nesting sites, which includes unmated loons trying to partner with existing mated males or females (chasing away or even killing an existing mate). I've had at least 2 different nesting pairs, there was switch in 2012/13. Since a loon looks like a loon (no real way to tell the difference), the switch date comes from a change in nesting date (indicating a different pair).
- In 1996, the brand new nest was official launched on April 16. The female loon arrived back on April 21 but never nested on the nest (never nested at all as far as I could tell).
- In 1997, the female loon arrived April 21 (the male had arrived a week earlier). She started nesting on May 26 and she hatched two chicks on June 23.
- In 1998, the female loon arrived back on April 20 (male arrived on April 3), she started nesting on May 29 and hatched 2 chicks on June 26.
- In 1999, the female arrived back on April 20 (the male arrived on April 7) and she started nesting on May 24 and hatched 2 chicks on June 20.
- In 2000, the female arrived back on April 18 (the male arrived on April 1) and she started nesting on May 22 and hatched 2 chicks on June 18.
- In 2001, it appears that both male and female arrived back on or about April 16 (ice breakup on lake was 2 weeks later than last year - perhaps delaying the male) and the started nesting on May 19. Two chicks were hatched on June 15.
- In 2002, the male arrived back on April 9 - not sure exactly when the female arrived back. She started nesting on May 20. Two chicks were hatched on June 16.
- In 2003, the male arrived back on April 16 and the female arrived back about April 29. She started nesting on May 25. Two chicks were hatched on June 22.
- In 2004, the male arrived back on April 14 and the female arrived back about April 16. She started nesting on May 22. One chick was hatched on June 20. A second egg never hatched. I eventually retrieved it and gave it to the Queen's University Biology Station (on Opinicon Lake)
- In 2005, the male arrived back on April 14 and the female arrived back about April 20. She started nesting on May 29. Two eggs were laid but neither chick survived the first day (I never saw the chicks although it appears that the eggs hatched).
- In 2006, the male arrived back on April 6 and the female arrived back about April 12. She started nesting on May 26. Two eggs were laid but nesting material got removed (blown away?) from nest - lost eggs.
- In 2007, the male arrived back on April 14 and the female arrived back about April 18. She started nesting on May 30. Two chicks hatched. Lost 1 chick on August long weekend. Second chick survived to fly south in late November.
- In 2008, the male arrived back on April 19 and the female arrived back about April 22. She started nesting on May 29. Two eggs were laid but neither chick survived the first day (I don't know what happened to them).
- In 2009, the male arrived back on April 2 and the female arrived back about April 12. She started nesting on May 27. One chick hatched but didn't appear to survive the summer.
- In 2010, didn't record arrival dates. Loons didn't nest - don't know why - nest looked fine.
- In 2011, the male arrived on April 7. No date for female. No date for nesting but 2 chicks hatched, one of June 17, second on June 19. Both appeared to have survived the season to fly south (they were both around in late October when I pulled my boat out of the water).
- In 2012, male back on March 22, female on April 2. They didn't appear to nest (or if she did, only for a short while). No chicks. In August muskrats ended up piling all sorts of crap on nest, sinking it.
- In 2013, male back on April 12, female later (didn't get a date). She nested early, on May 13. Two chicks hatched on June 9. Both chicks appear to have survived the summer, they were seen on the lake in November. I suspect that this is a new, younger pair of loons. They are nesting ten days to two weeks earlier than the previous pair.
- In 2014, both loons back by April 22. She nested on May 9. One chick hatched on June 7. Chick survived the summer, seen late October/early November.
- In 2015, first loon back April 18 (ice out on April 17) - second a few days later. She nested on May 12. One chick hatched on June 11. Chick survived the summer, seen late October/early November.
- In 2016, loons back early April (ice out on March 29). She nested twice, once on May 6 and then again on June 19. No success in either case - nest abandoned (nest itself looks okay)
- In 2017, loons back early April (ice out on April 6). She nested May 4 and hatched one chick on June 1. Chick survived the summer, seen in late fall.
- In 2018, loons back mid April (ice out on April 10). She nested May 12. She was off nest on June 10, no sign of any chicks (nest looked fine).
- In 2019, loons back late April (ice out on April 15). She nested May 13. Two chicks hatched (about 12 hrs apart) on June 9. Both chicks were seen in late October.
- In 2020, loons back early April (one on April 2, one about 2 weeks later). She nested May 5. Two chicks hatched on June 4. One chick was lost sometime during the July long weekend.
- In 2021, loons again back early April (one on April 1, one about 2 weeks later) - ice out March 29. She nested on April 29. Two chicks hatched on May 26. Both chicks were seen in late October.
- In 2022, loons were back early April (one on April 10, one a few days later) - ice out April 8. She nested on May 2. Two chicks hatched on May 30.
- In 2023, loons were back early April (ice out April 10). She nested on April 29. Two chicks hatched on May 29.
- In 2024, loons were back early April (ice out March 12). She nested on April 29. Two chicks hatched on May 28.
- In 2025, loons were back early April (ice out April 6). She nested on April 29. Two chicks hatched on May 28.
- In 2026, switched to a new PVC loon nesting platform. Loons were back early April (ice out April 10), 1st loon on April 10. She nested on May 2. Two chicks hatched on June 1.
and here is the reward for the work of building and maintaining a loon nest. These pictures were taken on June 21, 1999, one day after the chicks hatched.
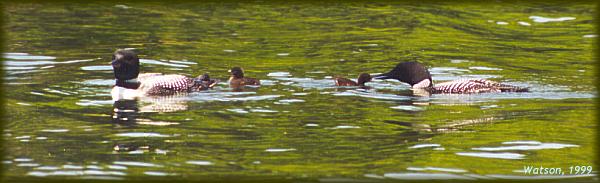
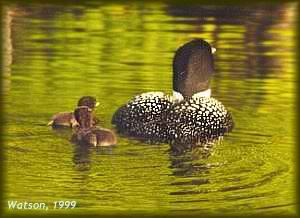 
top: loon parents feeding chicks, bottom left: female with loon chicks, bottom right: chicks riding on female's back
In 2004, I created a new brochure for Friends of the Rideau called "Be Rideau Loon Aware" about loon chicks and responsible watercraft use. The on-line version of the brochure can be found on the Friends of the Rideau website on the Be Rideau Loon Aware page (please note that this link will take you off this website). The brochure itself can be downloaded from the Documents section on this website.
|