| DPI vs PPI - please note that references here to DPI (Dots Per Inch) actually means PPI (Pixels Per Inch). I continue to use DPI since that's still how many people (incorrectly) understand it. And with some software (i.e. most scanning software), you'll still see DPI used where PPI is what is actually meant. DPI (meaning printer dots per inch) is essentially an obsolete term. But it's still in very common use as a term to mean PPI. See What is DPI. At some point I'll change all my DPIs to PPIs - but that's another project for another day :-) |
If you've come here after reading my article "The Myth of DPI" you'll already know that DPI has nothing to do with digital image resolution or quality. However, some people and places who are still ignorant of that fact (many graphics designers, magazines and print shops) still insist of getting a photo with an internal setting of ___DPI (usually 300 DPI) even when the photo's pixel resolution is sufficient to print the photo at the required PPI. The easy solution (rather than trying to educate them about real digital photo resolution) is to simply change the DPI setting of your image to whatever they want and send it along to them.
You may also wish to change the DPI so that the image will default size to the intended print dimensions when loaded into a word processor or desk top publishing program. For instance, if you want to set a 1500 pixel wide photo so that it will default to a 4 inch print dimension, then change the DPI setting of the photo to 375 DPI (1500 pixels divided by 4 inches = 375 pixels per inch).
The trick when changing the DPI is to do it without resizing (resampling) your image in the process. You want to change the DPI while retaining the original pixel dimensions (the real digital resolution) of the photo. I'll provide three examples, one using Adobe Photoshop (Windows & mac) and the other two using the free programs XnView (Windows, Linux & mac) and Irfanview (Windows).
Note that this procedure will not change the digital photo in any way other than to alter the internal DPI setting. The size and resolution of the digital image will be unchanged.
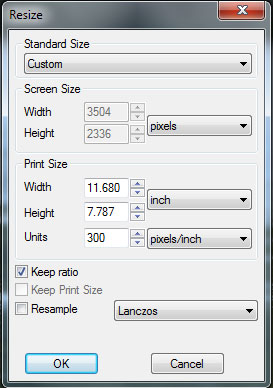
XnView Method
 |
| note that the "Resample Image" box is UNCHECKED and that the "Print Size" has been set to 300 |
- Open a folder with images and select an image to show full view.
- Select the "Image > Resize" menu option (not the "set DPI" option)
- In the image size dialog window, deselect the "Resample Image" checkbox (make sure there is no checkmark in that box).
- In the "Resolution" box type in 300 (or whatever DPI you want)
- Click the "OK" button
- Your image DPI has now been set to whatever you want (leaving the pixel dimensions of the image unchanged).
- Save this photo with a new name - I suggest adding a -300dpi extender (i.e. "345-2365-300dpi.jpg") to identify this new DPI image.
- See note below when saving to JPEG format
Earlier versions of XnView had a bug in which the DPI change wasn't recognized by programs such as Adobe Photoshop. This was fixed in 2009, so any current version is fine. There is a direct "set DPI" option, but you have to make sure to adjust both the X and Y to identical values (only the X value will be recognized by Photoshop, I'm not sure what happens with the Y, hence best to stick with the "Resize" dialog).
Adobe Photoshop Method
 |
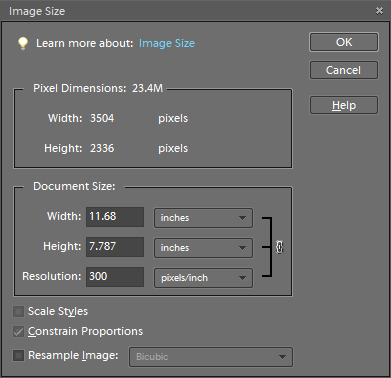
note that the "Resample Image" box is UNCHECKED
and that the "Resolution" has been set to 300 |
- Load your image into Adobe Photoshop (or Photoshop Elements).
- Select the "Image > Image Size" menu option (may be "Image > Resize > Image Size" in Photoshop Elements).
- In the image size dialog window, deselect the "Resample Image" checkbox (make sure there is no checkmark in that box).
- In the "Resolution" box type in 300 (or whatever DPI you want)
- Click the "OK" button
- Your image DPI has now been set to whatever you want (leaving the pixel dimensions of the image unchanged).
- Save this photo with a new name - I suggest adding a -300dpi extender (i.e. "345-2365-300dpi.jpg") to identify this new DPI image.
- See note below when saving to JPEG format

Irfanview Method
- Load your image into Irfanview
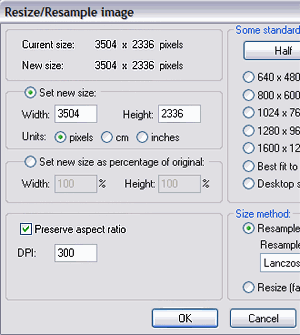
- Select the "Image > Resize/Resample" option
- In that dialog window you'll see a specific DPI data box
- Simply enter whatever DPI you want without adjusting anything else in that dialog window.
- Click on the "OK" button
- Your image DPI has now been set to whatever you want (leaving the pixel dimensions of the image unchanged).
- Use "Save As" to save this photo with a new name - I suggest adding a -300dpi extender (i.e. "345-2365-300dpi.jpg") to identify this new DPI image.
- See note below when saving to JPEG format
Saving to JPEG - please note that JPEG is a digital photo format that uses variable compression - that is, you can change the compression. Your camera should (if you have it set correctly) be using low compression (highest quality). To emulate this when doing a "save as" from a photo program, choose a compression of about 95 (Adobe Quality 10+).
If you are using XnView, when you do a JPEG save, click on the "Options" button to give you the JPEG save dialog and move the slide towards "Best" to whatever number (i.e. 95) you wish. Using Irfanview, when you do a "Save As" in JPEG format, note the dialog box with the JPEG options - move the slider to 95 (or higher if you wish) for best image quality. With Adobe Photoshop (incl. Elements) - choose quality 10 or higher in the dialog box that comes up when you do a Save As in JPEG format.
A verification is to check the image filesize (in kilobytes or megabytes) of your copy of the photo against the original digital photo. They probably won't be identical, but should be close. If there is a big discrepancy in filesize then you've done something wrong.
Other Programs
Other photo programs are going to have a similar process. The key is to make sure that the image IS NOT being resampled (pixel resized) when the DPI is changed. As long as the pixel dimensions remain unchanged, your new DPI photo will be identical to your original photo, only the internal DPI setting of the photo will have been changed. Your print shop, graphics designer or magazine should be happy campers with your "new higher DPI" image.
|

