
So You Want to Make a Print
For many people, printing at home with an inkjet printer is a quick way to make nice looking prints. To get the best results, you should follow some rules:
Rule 1 - DON'T DOWNSIZE YOUR DIGITAL PHOTOS FOR PRINTING (actually, this is the only rule). Unfortunately, some photo programs (i.e. Adobe Photoshop) actually encourage people to do just this. Here is the scenario:
- A person wants to make a 6" x 4" print.
- So, they go into Image Size within their photo program and see that it is telling them that the size of their images is 28" x 21" (yikes!!)
- Following what seems to be what the photo program is logically telling them, they change the setting to 6" x 4.5" (they enter 6 and the program using the aspect ratio of the original image sets the second dimension to 4.5") and click on the OK button.
- The program dutifully resamples their photo down to 6" x 4.5" in size - taking their original 2048 x 1536 pixel size photo down to 432 x 324 pixels (yikes again!!)
So, what happened?
Well, if you've read the other pages on this site you'll know that the photo program just resampled their image based on the DPI/PPI setting. The original camera photo had a DPI/PPI setting of 72. The program divided 2048 pixels by 72 pixels per inch and got 28 inches. This is a holdover from many years ago when these programs would set the DPI (printer dots per inch) of the output - this is no longer the case but these programs still hang onto this arcane methodology. So, Rule 1 (the only rule) - DON'T DOWNSIZE YOUR DIGITAL PHOTOS FOR PRINTING.
What to Do?
 The first thing I would recommend is to see if your printer came with photo printing software. If it did, then this is probably the best software to use for everyday printing. My printer came with software that makes printing a breeze. The first thing I would recommend is to see if your printer came with photo printing software. If it did, then this is probably the best software to use for everyday printing. My printer came with software that makes printing a breeze.
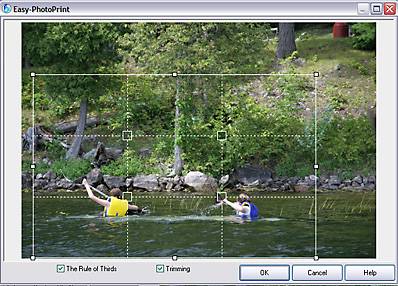
Printing becomes a simple 3 step process, 1) choose the photo, 2) choose the output size and paper type and 3) decide if you want to crop (trim) the photo. The image on the right shows the cropping (trimming) screen (with the rule of thirds invoked). Note that this cropping in my photo printing software doesn't affect the original photo - it just sets it up for printing. The cropping outline will always match the aspect ratio of your desired paper size (i.e. 4 x 6, 5 x 7, 8.5 x 11). If you crop with photo editing software (i.e. Photoshop), always make sure you're working with a copy of your photo, not the original (since if you crop and save the photo, it will be forever changes to that cropped size).
If you don't have this type of software you can buy software specifically designed for home printing. Examples of this would be Digital Domain's "Qimage" or Arcsoft's "PhotoPrint", both specifically designed to make photographic prints on a home inkjet printer.
You can also use your existing photo software to make prints (with a bit of manual effort). I'll provide a couple of examples:
Adobe Photoshop (Elements, CS or CC)
- Load a COPY of your image into Photoshop
- Crop the photo to the desired framing/aspect ratio (see Aspect Ratio of a Photo on the Changing Size page for more info). For instance, if you want to print a 6" x 4" picture and your digital version is not in a 6 x 4 aspect ratio then select the cropping tool (marquee tool) and in "Style" select "Fixed Aspect Ratio" and enter a width of 6 and a height of 4. The marquee will now maintain this ratio when you go to crop your photo. So, select away. When you have achieved your selection, go to the Image menu and select "Crop" - your image will now be in the aspect ratio you have chosen. For more info about cropping see the page on Changing the Size of a Digital Photo.
- Go to the File menu and select "Print"
- In the Print menu, depending on the version of Photoshop, you can either directly select the page size or do this in your printer setup. Either way, set the size of your print and the orientation (portrait or landscape). Once you've done this, click OK to return to the Print menu and select (put a checkmark in) the box that says "Scale to Fit Media". Click the Print button and print away.
- If your image is perfect you might want to save the cropped version - use "Save As" and add something like "6x4-cropped" to the image name to identify the cropped image.
Irfanview
A caveat here is that Irfanview is not the ideal program for printing. Use it as a last resort.
- Load a COPY of your image into Irfanview
- To crop to a specific aspect ratio in Irfanview, follow these instructions (click link).
- Go to the File menu and choose Print
- Set your printer (orientation, paper size, quality) - choose "Best Fit to Page" and then choose "Center Image". Note that if you have an area selected (bounding box) then Irfanview will only print that area.
A Word About Printers
A general rule with current ink jet photo printers (i.e. HP, Epson, Canon) is that these printers work best (colour matching and photo longevity) by using the manufacturer's own inks on their own paper. So, when setting up your in-home print shop, first try your system using the manufacturer's inks (not cheaper 3rd party inks) on the manufacturer's best quality paper (i.e. a glossy or matte high quality photo paper). Use this to benchmark your system. After it has been set up you can fool around with 3rd party inks and paper if you wish. Don't test using plain paper since the colours on top quality photo paper will look dramatically different (much better).
Colour (color) Management
If you do a search on the Internet for Digital Photo Color Management you will find thousands of pages on the topic. I'm not going to get into it here other than a very brief synopsis of the topic.
The issue is matching the colour of the photo on the screen to the colour you get on a paper print. Ideally, the colours you see on the screen are what you will see in the print. This will generally be the case if you are using any recent computer and printer and you are shooting and maintaining your photos in sRBG colorspace. Most digital cameras by default shoot in sRGB. Your printer will recognize this and match its output to your sRGB display. Most consumer commercial systems (regular photo stores) also match their printed output to sRGB colorspace digital photos.
If you're having a problem with colour, then do the Internet search described above and be prepared for a long and often confusing explanation of how to match screen colour to printed colour.
For the serious, you can calibrate your own displays using a device such as the Datacolor Spyder. This is a device (hardware and software) that will measure your screen's colour and allow for fine adjustments. It will also generate an ICC profile specific to your monitor so that you can match output with your printer (see "Your Monitor" below for more info).
DPI of Printers
When printing, the printer software takes the digital image and re-maps the digital pixels into printer dots using its own custom algorithms so there is no direct relationship between a digital image pixel and a printer dot. As part of the conversion process, it is also changing the colour space of the image from RGB to CMYK (see colour models for explanation) - or even if the digital image is set as CMYK, into its own form of CMYK to match how it does colour.
In the printing process, the quality of output is dependant on the amount of digital data delivered into the conversion procession (the PPI), the quality of the printer software (the re-mapping algorithms the printer software uses), the physical attributes of the printer (types of printing heads, quality of ink, etc.) and the quality of paper.
The rated DPI of many home ink-jet printers is in the +1,000 range - the caveat with this number is that it represents a blended dot (overprinting a single "dot" with different colours to create the colour that is needed). There is no direct relation between a pixel in a digital image and the printer's "dot" - but both play a part in the quality of output. If you deliver 50 pixels per inch to a printer printing 1,200 dots per inch, you're not going to get a good print. The reverse holds true, if you deliver 1,200 pixels per inch to a printer doing 50 dots per inch, you're also not going to get a good print.
So, for good printing, it's not just the rated DPI of the printer that counts. It's how the printer does the conversion process and how it then delivers that to paper. When buying a printer, don't just read the specs, read the reviews that look at the quality of output. If you have a good printer and deliver enough pixels per inch from a good quality digital photo, you'll get a good "photographic quality" print (given the other issues noted above and the monitor info noted below)
Your Monitor
The main problem in matching colour on the screen to that coming out on paper, is the screen. In the "good old days" we all used CRT (Cathode Ray Tube) monitors. While big and clunky, they excelled at colour rendition, they were much better at displaying colour than consumer grade LCD monitors. Many low cost LCD monitors (your basic home monitor, your laptop screen) are based on a TN (Twisted Nematic) LCD panel. This panel has a restricted colour gamut (range of colour - only 6-bits per channel) and the brightness changes with the viewing angle. This makes this type of LCD screen very difficult to use for proper digital photo colour management.
There are much better LCD panels available, these include IPS (In-Plane Switching) panels and OLED (organic light emitting diode) panels. Both of these have much better colour (often 12-bits per channel) and are stable in viewing brightness over fairly wide angles. We are now seeing lower cost IPS and OLED monitors and there are better technologies being developed for display screens. In general, ISP is generally best choice when it comes to photo editing. If you are looking to buy a high end monitor, read the reviews (it's not just about the type of panel).
Those serious about digital photo editing and printing will have an ICC profile (International Color Consortium) for their setup (the really serious will do a custom calibration of their monitor(s) using a device such as the Datacolor Spyder). The ICC profile basically maps the colours produced by your monitor to desired output formats (i.e. paper). Generic ICC profiles are available for most monitors, or you can buy hardware to create your own custom ICC profile. Do an Internet search about ICC profiles (and be prepared for much reading).
The Quick Fix
For many, the problem is not colour but brightness, known in computer terms as Gamma. If your monitor is set too bright or too dark then your printer output will not match what you see on screen. This problem has been exacerbated in recent years with the advent of LCD monitors, where the viewing angle can affect the apparent brightness of the screen (see above).
The fix is to adjust the brightness of your monitor to match the brightness of your printer's output. A quick test to see if your monitor is in the ballpark is to see if you can see the message in filmstrip image below:

Is this filmstrip black or can you see a message?
If you see a message, your monitor is too bright.
Turn down the brightness level until the filmstrip just starts to appear black.
For more information follow the copyright link:
Filmstrip image copyright: Timo Autiokari
If you want a free program to quickly calibrate the gamma for your computer, have a look at QuickGamma.
|
