
Copying Family Photos
 |
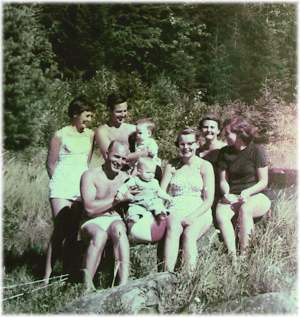 |
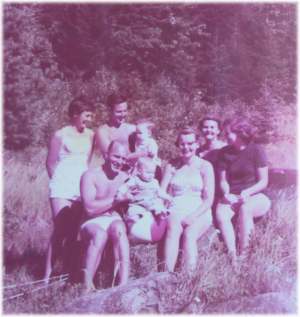
| Colour photo taken in 1955 |
Digitally photographed and colour corrected |
A common problem with family photos is that only one person has physical possession of an old family photo album. It might be an aunt or uncle, who will eventually pass it on to some grandchild, niece or nephew. How to make these photos easily available to all members of current and future generations? The solution is to digitize the photos. This can be done with any digital imaging device such as a digital camera or a scanner. Each has its strengths and weaknesses - see the Digital Camera vs Scanner page for details.
Another issue are the dozens or perhaps hundreds of colour family photos your family might have that were taken in the 1950s, 60s, and 70s that are now starting to colour shift into the red spectrum. Unless these are preserved, they will be lost forever. One preservation method is to capture them digitally.
General methodology for copying photos with a digital camera and copying slides with a scanner are presented below. For general scanning, see the Scanning Page. For specific workflow examples (step by step examples) see the Workflow Examples for Photo/Document Copying Page.
Copying with a Digital Camera or Smartphone
TIP ONE: The most important thing to consider when using a digital camera or smartphone is steadiness. To produce the sharpest possible copy the camera or phone needs to be rock steady. So, if you only remember one thing it's to keep the camera steady. A tripod, and in the case of smartphone, a smartphone holder for a tripod, is a must.
NOTE: The following is written for a stand alone digital camera (and all the camera controls a regular camera offers). With a smartphone, some of these can be replicated to a degree with software, it depends both on the camera in the phone and the camera app that controls what the camera does. Not all apps are created equal so you may have to search around for one that does what you want.
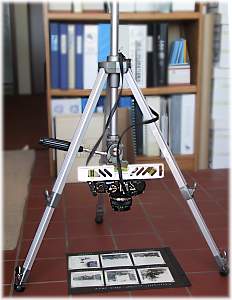 |
| An inexpensive copystand. Camera is mounted upside down between tripod legs. A level is used to make sure the camera's lens is exactly parallel to the photo. Note that tile floor makes a convenient grid on which to line up the camera and photos. |
To copy photo albums and old documents (journals, wills, etc.) the ideal thing to have is a copy stand. This is a device that has a firm base on which are mounted two lamps, one on each side, with a post at one end with a bar near the top extending out over the copy stand. This bar has a camera mount allowing the camera to be mounted upside down over the documents. The two lamps provide even, shadowless lighting. Since this is beyond the means of most amateur family historians, simple substitutes can be used. These include:
A Tripod – this is a must have. Ideally you want a tripod where the centre column can be reversed so that the camera will sit upside down between the tripod legs, shooting straight down.
Lighting – if you can afford it, or plan to do a lot of copying, a couple of small studio lamps are ideal. You will need two of these to create shadowless lighting. If you don't have any lamps, natural daylight is a good substitute (indirect daylight, not direct sunlight). The problem with daylight is that it can be uneven (clouds moving around) and it is generally not available at night. Exposure bracketing can help to alleviate the problem with shifting levels of light (three photos taken one after the other, one properly exposed, one overexposed and one underexposed).
Things to remember:
 |
Stability - try to make sure there is a minimum of camera shake. The bigger and heavier the tripod, the more stable the shot. You can use your camera's remote or self-timer to take a "hands off" picture (since pressing the shutter can induce camera shake).
|
|
Parallelism - the camera lens should be exactly parallel to the work being photographed. Use a small level to make sure (first make sure the object you are photographing is level, then level the camera lens).
|
|
Edge Distortion - most wide angle lenses have some distortion. This is usually in the form of bowing of the edges. Since most digital cameras have zoom lenses, try to take photos with your camera lens at the 35mm camera equivalent of about 52 mm. Digital cameras have a smaller sensor than 35mm film which means that this 52mm number is achieved with a much lower lens setting (32 mm on my DSLRs, as low as 10 mm on some of my compact point and shoot cameras). Find out what the 52mm (in 35 mm film size terms) equivalent setting is for the camera your have. If you don't know, a quick solution is to go to full wide angle and then apply a bit of zoom. Distortion can also be minimized by keeping the camera lens exactly parallel to the work.
Note to Smartphone users: The discussion above presumes an optical zoom (camera lens elements). Most smartphones use digital zoom (a sensor crop), it's not an optical zoom, so with most smartphones it is best not to use the zoom since that will result in a degraded image.
|
|
Exposure - if possible bracket your shots. Take 3 pictures of each object, one at normal exposure, one 2/3 to 1 f.stop higher and one 2/3 to 1 f.stop lower. It is very hard to judge exposure on the little LCD screen. The photo can only be judged when you get it back to the computer.
|
|
ISO - make sure your ISO ("film" speed) is set to the lowest your camera will allow (usually 100). This is to minimize digital "noise" in the photo.
|
|
Size - make sure your camera is set to capture the largest image size it can.
|
|
Quality - make sure your camera is set to either a lossless format (RAW or TIF) or if using JPEG, make sure it is on the best quality or superfine setting.
|
|
Depth of field - this normally isn't an issue with 2D objects (photos) assuming you have the lens parallel to the work being photographed, but it can be a problem with 3D objects (heirlooms, etc.). With any camera, a small f.stop will result in a small depth of focus (the depth of field). Most camera's auto setting will balance the shutter speed with the f.stop of the camera to achieve the best exposure. If you are taking a picture of a 3D object, you may want to maximize your depth of field (set your f.stop to a high number using the aperture priority feature of your camera or by setting the camera to manual).
|
|
Reference/Context - when taking photos of old objects such as photo albums and family bibles be sure to take a picture of each full page in addition to detailed pictures of each photo on the page. The full page picture will put the photos in context. Have they been grouped in a certain way? How were they fastened to the page? Even seeing the edge tears can add character and give the viewer a sense that they are seeing something old and valuable.
|
Quick Checklist
Before you make your first copy, run through this checklist:
|
Camera Steady – firmly attached to the copy stand or tripod |
|
Quality – camera set largest size photo in either RAW or highest quality JPEG |
|
Parallel – camera absolutely parallel to the subject being photographed |
|
Edge distortion – camera lens set to just a bit of telephoto |
|
Macro Setting – if the subject is very close, turn the macro setting on |
|
Aperture – aperture set to a high setting (f/5.6 or above) |
|
Flash – flash turned off |
|
ISO – ISO set low (or on Auto) |
|
Remote release – set camera to be triggered by a remote control or its self-timer |
|
Auto-Bracketing – if you are using auto-exposure bracketing, make sure it turned on |
For more detailed workflow examples, see the Workflow Examples for Photo/Document Copying Page
Using A Scanner
For tips on how to best use a scanner to copy photo - see the Scanner Page.
Copying Slides
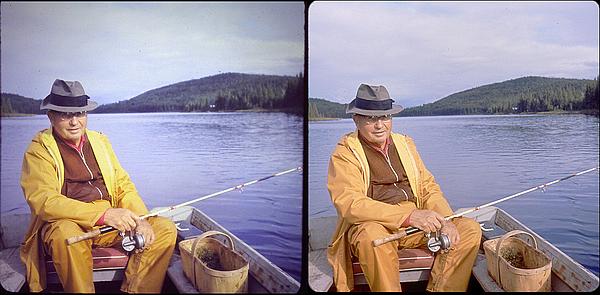 |
| The slide on the left was copied using a digital camera, the one on the right with a scanner. The scanner version shows a much greater dynamic range and highlight control. This type of problem is not evident on regular photos which rely on reflected rather than transmitted light (so a digital camera usually just as good as a scanner), it is just an issue with slides. The best thing to do if you are able is to test all available methods (i.e. camera, scanner, commercial digitization) with a few representative slides and see which produces the best results. If these are treasured family photos, it is worth the effort to do the best job you can. |
A scanner is the best choice when it comes to copying slides. Although it can be done with a digital camera, a flatbed scanner that has the ability to do slides (requires a light in the lid) is the better option as can be seen from the comparison photo above.
For the serious, a high resolution film/slide scanner will provide the best results, but that's beyond the discussion on this page. For most of us, a flatbed scanner with slide scanning capabilities is the most economical option. For some info about how to scan slides see the Scanning page and for detailed workflow examples, see the Workflow Examples for Photo/Document Copying Page.
Good software is critical. A scanner that comes with software that allows the use of exposure curves, especially ones that enhance shadow detail, will provide better results. A excellent alternative to the software that come bundled with a scanner is the program Vuescan that can be used with most USB and SCSI scanners. It is a commercial program available from www.hamrick.com. Note though that Vuescan is best used by those with some familiarity with computer programs and scanners (it has lots of bells and whistles).
Another slide digitization option is to take them into your local good quality photo shop and have them digitize your slides. This is a good option for those that don't want to go through the "do it yourself" learning curve.
No Digital Anything
If you don't want to muck about at all with digital, just take your photos to a local good quality photo store and have them digitize them for you.
|
